Blueberry & Lentil Meatloaf

I might just be getting a little too ‘artsy’ with these photos.  Have no fear, my wife and kids all rightfully bust my chops every time I break out my phone to snap a picture of my plate.  I can take it.

You know what else I can take?  When I try out a new recipe that blows my mind.  Straight up, not many in the family were gung-ho about this one, but MAN, I loved it.

Blueberry & Lentil Meatloaf

I followed the linked recipe pretty close to the letter.  Putting fruit in a meat dish, I didn’t want to take many chances.  That said, I used regular mustard instead of dijon and white vinegar instead of apple cider vinegar.  It’s what I had on hand.  I also subbed out the ‘chipotle pepper in abodo sauce’ (what is THAT?) for some pepper flakes I had kicking around.

Aside from that, this is your regular ordinary meatloaf in sauce.  Keep the blueberries frozen when you’re mixing up the loaf, it’ll save you from having them get all smushed up and blue handed.  The other thing of note.  This took WAAAAAAY longer in the oven then their recommended cook times.  Like, twice as long.  If you have a meat thermometer handy, this is definitely the time to use it now and again to get a core temperature.  Remember, you want to stick the probe into the middle of the loaf, don’t take a temperature too close to the pan or the edge as that won’t give you an accurate reading.

Again, I really liked this one.  It’s sweet with heat.  I really want to try this again sometime with saskatoon berries.  Combined with lentils and beef, this could be a fantastic ‘taste of the prairies’ trifecta.

-g


Sweet and Sour Meatballs

Okay, so for today’s challenge I had a couple of criteria.

1) I had about half a can of pineapple left over from making pizza that I needed to use up
2) We have a couple picky eaters that had been opting out of some of the meals as of late.  I try not to take it personally.  (I wounds me to the core).

Enter…meatballs!  Everybody likes meatballs, don’t they?  A bit of googling found me this beauty of a recipe.

Baked Sweet and Sour Meatballs

Overall, the recipe itself was pretty easy to make.  Essentially all a meatball is, is a tiny round hamburger.  Now, the link there called for ground turkey, chicken or pork.  I went with beef as it is what I happened to have on hand (being a good prairie boy and all…).  Pork is cheaper at the store, I’ve never really enjoyed ground pork.  Don’t get me wrong, I find the best hamburger and meatball recipes around typically have some sort of ratio of beef to pork, I just didn’t have any handy.  I also just went with 1lb of protein (as opposed to the 1.5 called for) as that’s how I portion out meat for the freezer.  That worked out though – I’ll explain how in a bit….

If you want to get fancy, you can break out a kitchen scale and weigh your meatballs for the sake of consistency.  I didn’t bother.  What you can do is grab an ice cream scoop or a large spoon and use that to scoop out what will become your meatball.  There is something to be said about some standardization with these.  It helps with cooking time, it also helps avoid any “but his is bigger!” comparisons when you’re dishing everything out at the table.

For the sauce?  Follow the recipe.  It worked out great.  In fact, my wife and I almost came down to a coin flip for the leftovers on this one before I graciously let her have them (awww, such a nice guy, right?).  It’s a sweet sauce with a touch of kick.  Very flavourful.  And the best part?  As I made 1lb of meatballs, there was plenty of sauce left over to spoon over the rice.

Have I mentioned my trick to good brown rice?  2 cups water for every 1 cup of rice.  Put rice in water.  Put on high heat covered.  When the water starts to boil, lift the lid, stir things up.  Put the lid back on, turn the heat down to around…3.  Walk away for 45 minutes.  Come back, take off heat,  Lift lid, fluff with fork.  Bam.

The real trick of course is to use a pot that is about one size larger than you think you’ll need.  Stops the rice from boiling over.  That stuff is a PAIN to clean off your stove.

-g

Leftovers!

Like most people who wind up doing the cooking, there are days when you just need a break, or alternately, there are days when you look in the fridge and realize…”man, this is getting jam-packed full with leftovers”.

Enter…Sunday’s around our place.  While Sunday lunch has been set aside for Sunday Pancakes, this past week we had some of those leftover (that rarely happens) so it was time to figure out how to burn through some flapjacks and clear up some shelf space.

My wife says this isn’t a ‘blog-worthy’ recipe.  I disagree.  This entire blog is about recipes that an everyday ordinary guy who’s been out of the kitchen for years can manage to make.  Some are big winners and require some skills…and some are, plain and simply, Leftover Pancake Pizza.

Leftover Pancake Pizza

  • leftover pancakes
  • pizza sauce
  • shredded cheese
  • toppings to taste

Put your pancakes on a cookie sheet (no toppings, just the pancakes)

Set your oven to ‘broil’.  Put the cookie sheet in for a few minutes until the upward facing side of your pancake is getting a bit crunchy/crusty to the touch.

Take cookie sheet out of oven.  Flip pancakes over.

Add sauce, toppings and cheese.

Put back in oven until the cheese gets nice and melty.

Enjoy.

It’s quick, fun, and the kids loved ’em.  You could always toss leftover pancakes in the toaster and put some jam on ’em, but….c’mon.  It’s pizza!  And….pancakes!

Food can be fun and creative.  So can your leftovers.  Enjoy!

-g

Carrot, Red Lentil and Ginger Soup

I have a bad habit of shopping for the ‘sale’ stickers when wandering the aisles of the grocery store.  A good deal is a good deal, right?  That’s what I tell my wife.  She reminds me of course, that a bargain is only a bargain if you were planning on buying that item anyway.  If you’re buying something that wasn’t on the list…you’re just spending more money than you intended!

Such a buzzkill, right?  Well, I saw a good deal on lentils the other day and picked up a bag of red and green.  I do after all live in the Province that accounts for 95% of all lentil production in Canada, which as a whole, accounts for 51% of all lentils produced worldwide!  That’s not too shabby.  I guess I should try and familiarize myself a bit more with this domestic crop.

After a bit of google searching I discovered that green lentils are the ones that hold their form more when cooked, while red lentils soften a fair amount and are therefore used more for soups and such.  With our first snowfall hitting late last week, a nice hearty soup sounded like a great idea!

Carrot, Red Lentil and Ginger Soup

While I already had the lentils in hand from a previous trip, I made a special trip to the store to pick up the fresh produce to be used in this recipe.  One thing I learned?  Scallions is just a fancy name for green onions.  I couldn’t find scallions in the store no matter how hard I looked, so I split the difference and picked up some green onions (which LOOKED like the picture of scallions I found on my phone) and shallots (which sounded like a better match).  I went with the shallots in pot when I made this.  Honestly, I think you’re just going for a bit of an ‘onion’ flavour in the soup, and I already had some green in the mix with the jalapeno.  There’s a fair bit of chopping and shredding with this.  After that, it’s really a matter of tossing everything in the pot to simmer.  On the whole?  The recipe is a bit bland as outlined.  The ginger sticks give you a real kick when you hit one, but I wound up stirring a bit of chili powder into my bowl after a few spoonfuls as it felt like it would pick things up a bit.  My wife went for the salt.  In defense of the recipe it DOES say ‘season to taste’.  Just a heads up, you’ll want to do that before serving because IT NEEDS IT.

With all that said, this is a very warming and healthy soup.  Lots of veg in here and the lentils pack a protein punch.  Very filling.

Budget –

There’s a fair amount of fresh veggies in this.  That said, lentils are a very affordable source of protein and I barely touched what was in the bag I bought.  I’m going to guess that this one ran about $7 all tallied.

But oh!  We’re not done yet.  If there’s one thing I enjoy more than busting up some crackers into a bowl of soup, it’s a nice warm ‘fresh-out-of-the-oven’ biscuit.

IMG_20180920_1806117

Easy Homemade Biscuits

Look at the lamination on those babies!  While the lentil soup was simmering on the stove top, the oven was feeling a bit neglected.  I stumbled across this recipe for a quick and easy biscuit, and I AM KEEPING IT!  They’re fluffy with a great rise, the lamination worked out great.  I think I really just need to follow the instructions better and make them circles, as, you can plainly see…if they start expanding with one side still ‘crimped’ they’ll just puff up and fall over.  Hey, that’s why you’re reading this right?  Learn from my mistakes!  As explained in the recipe…the key is to keep your butter cold and not overwork it.  You could probably chill the dough after a few folds and before cutting.  I folded it until things were starting to warm up and get a little sludgy.  That probably resulted in a few more layers than required, but I’m not knocking it.  After baking the layers just peel apart.  Again, not a lot of salt of ‘flavour’ built into these biscuits, but they’re designed to sop up the soup or stew, so that’s probably a good thing.

As for the family score-card?  Kids weren’t exactly sold on the soup.  The adults loved it.  The biscuits were a 5 thumbs up from the entire clan.

-g

Chicken Cacciatore

A bit of an aside before we begin.  I am a HUGE fan of a really bold and fresh tomato flavour.  When the tomato POPS, I am a happy camper.  This recipe pulls that off in spades.

So…after making pizza’s the other night I had an abundance of half chopped veggies kicking around in the fridge.  After a bit of searching, I found a dish that seemed to cover off the bases when it comes to flavour and also burn through some of those veg in the chill box.

Chicken Cacciatore

  • 1 lb boneless, skinless chicken breasts (basically 2 full chicken breasts – cubed)
  • 1 tbs vegetable oil (canola / olive…really doesn’t matter)
  • 1 sliced medium onion (you want this to be a bit of a ‘chunky’ cut)
  • 1/2 sliced green pepper (again with the chunky cut)
  • 1/2 sliced red pepper (…ditto with the choppin’)
  • 2 cups sliced fresh mushrooms (if you like them.  I don’t, so….hard pass)
  • 1 tsp minced garlic
  • 1 big can of crushed tomatoes (796ml/28fl oz)
  • 2 tbs chopped fresh parsley (I used a few solid shakes of dry…)
  • 1/4 tsp pepper
  • 1 tsp salt
  • 2 tsp italian seasoning (I went with oregano which I had on hand)
  • 1 tsp dried basil
  • parmesan cheese (to sprinkle on at the table
  • 1 package of egg noodles (I went with fusili – I had some on hand)

This one is pretty easy to pull off.  Put the oil in a deep pan and cook the cubed chicken over medium heat.  Once you’re done with that, remove the chicken, toss in all of the dry veggies and basically stir fry them until the onion has become translucent.  Once that happens, toss the chicken back in.  Add the crushed tomato and spices, cover and simmer for 15 minutes or so.  Done.

In a separate pot, boil the water, cook your noodles.  Drain.

Scoop some noodles onto plate, put a big hearty scoop of the chicken/veg mix on top, and then shake on some parmesan to finish (I usually grind a bit of pepper on top for the fun of it).

This one is a winner.  It tastes fresh, it has pasta, there’s all sorts of veggies in there.

Budget wise?  You’re looking at…

2 chicken breasts… ~$5
can of tomato… $1 if you catch a deal, $2 if you don’t
onion/peppers…$2.50
noodles…$2.50
mushrooms…$2.00
spices…negligable

All in all, you’re looking at about $14.  We had company over so this one fed 4 adults, 3 kids and we still had some leftovers.  I ripped up a couple heads of romaine on the side like I usually do when serving a pasta.  So that was a couple bucks more.  All in all?  It’s going on the list!  Bellissima!


Apology Pizza

First off, my apologies.  I’m still sorting out my posting frequency on here (Just weekdays and take weekends off?  Only when I have a recipe worth sharing?)  Once I hammer that out I’ll be sure to let you know, in the meantime, I was hoping to kick off the new week strong, but with family visiting for the weekend, I’m just getting back into the swing of things now.  On the plus side, that means I’m backed up with quite a few recipes, some of which were definite winners.  As an olive branch, let’s kick back into things with a two-fer.  My apology to you.  Pizza.  Times two!

My kids love pizza.  I love pizza.  Let’s face it, I think everybody loves pizza or suffers from some kind of mental glitch.  Now, while my kids are quite content with a fresh n’ hot pie from Little Caesars (they’re alright in a pinch), I like my pizza to be a bit more substantial while not quite costing the same amount of a standard grocery bill.  Hey, I just spent a fair amount of time in Regina Saskatchewan, the pizza capital of Canada.  They do a great slice.  It usually includes about a half inch of toppings, half inch of cheese and a second mortgage on your house.  Finding a nice middle ground is my goal here.

Enter our challengers.  Pizza #1 – aka “the kid pizza”

IMG_20180913_1857403

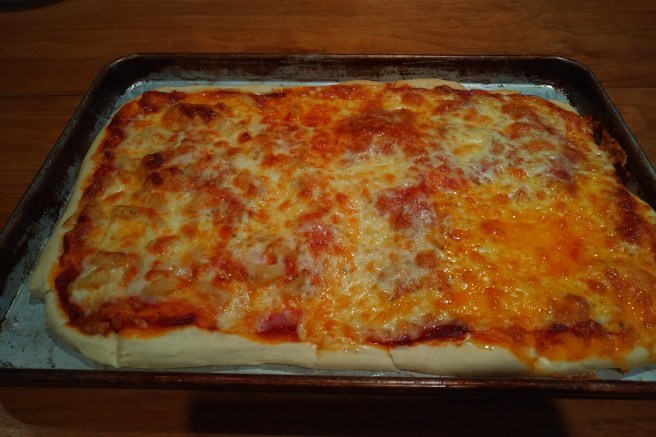
For this one, I went with something a little more basic.  A quick rise dough kicks things off.  I found the dough really wanted to keep springing back into a ball after stretching it out, so it took a while to get it to fit the baking sheet.  It turned out alright though.  I used some tomato paste as a base coat, followed by a can of Kraft pre-made pizza sauce.  A few spices (oregano, garlic) sprinkled on the sauce wrapped up that part.  I then added some cooked ham and pineapple on one side (yes, pineapple on pizza is a MUST), some deli sliced pepperoni on the other, leaving a corner free for my picky eater who prefers just a plain cheese pizza (we’ve yet to leave them home alone while we jetted off to Paris – so, parenting points +1).   Once the toppings were on, I added a metric tonne of mozzerella cheese over the whole thing, and a bit of cheddar and parmesan over the plain cheese section.  Oven.  400 degrees F for 23 minutes (I was going to do 20, but again, our oven cooks a bit slower than most it seems).  This one turned out pretty solid.  The crust was light, not very greasy at all.  I call that one a winner.  Satisfied the kids, was a bit more substantial than the pizza chain heat lamp, or even the grocery store deli ‘take and bake’.  Thumbs up all around.

But I can’t just leave well enough alone, can I?  Enter, Pizza # 2 – aka “the adult pizza”

IMG_20180913_1941334

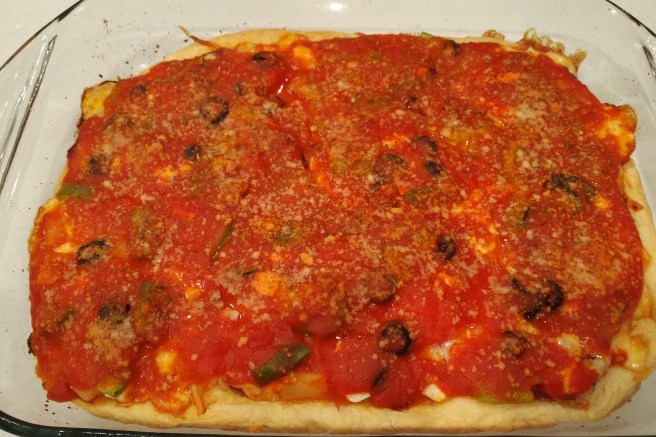
Ever since I saw an online video espousing the glory of authentic Chicago style deep dish, I’ve been tempted to take a swing at one of those on my own.  With an entire day on my hands and a fridge full of my favourite toppings, it was time.  A google search found me what claimed to be a real Chicago deep dish dough recipe.   Warning and heads up.  This dough requires a significant and serious amount of rise time.  We’re talking SIX HOURS at a minimum.  You need to be serious and committed and have some prep time earlier in the day if you’re going to tackle this for dinner.  I followed the recipe with a minor change of using canola oil (I had on hand) in place of corn oil (never knew that was a thing until today!).  The rise was pretty uneventful, I thought things might puff a bit more than it did, but it worked out alright.  Without a real deep dish pizza pan, I used a large Pyrex dish with some decent depth and the dough filled that up nicely.

If you’re unaware, Chicago style…and I mean REAL Chicago style deep dish pizza prides itself on a few things.  A nice thick crust, and the sauce on top.  That seems incredibly foreign to me.  But…the mission was ‘authentic’, so…tarry on.

After stretching out the dough to fill the pan, I formed a bit of a lip on the edge of the crust.  I then added a metric tonne of mozzarella.  Some of my favourite toppings followed, including ham, pineapple, pepperonni, black olives, green pepper, even some feta cheese chunks I had left over from what turned out to be Greek Week a couple weeks back.  Next up?  Some tomato paste for a solid shot of concentrated tomato flavour, some more of that pre-fab Kraft pizza sauce (about a small can and a half) I then added some spices to the sauce, sprinkled a bit of pepper over the works, some parmesan cheese and tossed it in the oven at 450 degrees F for about 30 minutes.

I understand why most Canadian pizza joints put the cheese on top.  Presentation wise, it just looks SO much more appealing to have a nice molten cheese on top, rather than what amounts to as best I can describe it, tomato puke on a plate.  With that said, dang that was a good tasting slice of pie.  If I had to rank things, I’m obviously going to give the edge in toppings and taste to the adult pizza I made.  I mean, it was designed specifically for me.  For the crust?  As much as the deep dish was the more filling option, based on the sheer amount of work and rise time involved?  I’m going to go with Crust #1 as the winner here.

There you have it.  2 pizza recipes for the price of…well, none.

Budget wise?  This would be pricier than some of my more recent offerings.  Face it, cheese ain’t cheap.  With that said, my rough guess would put this at around…$15-20?  And that still left me with a fair amount of cheese on the block, and leftover olives and pineapple.  This won’t be an everyday meal due to cost and time involved, but if you find yourself with an abundance of cheese and some leftovers that would work out alright on a slice…go nuts!  It’s also a good one for special occasions by ‘request of kid’.

-g


Nana’s Meatloaf

I had to google a picture.  The ONE time I forget to break out my camera and take a shot, is the most staple of staple meals around our place.  We call this one Nana’s Meatloaf.  The recipe, I believe, came from the Once A Month Cooking cookbook I have previously mentioned.  There’s a difference though.  In that cookbook, this recipe as actually made up of flaked ham I do believe.  We’ve made it with ham (which I typically don’t eat), we’ve made it with ground pork, but for best flavour/texture/results…I recommend good ol’ fashioned lean ground Saskatchewan or Alberta beef (call me a homer, that’s fine).

This recipe winds up with plenty of sauce to spoon over rice (which works great as a side with this one), we will also typically pair it with some corn or green peas (or both if we’re down to the dregs of the bags in the freezer!)

Nana’s Meatloaf

Loaf

  • 1 lb lean ground beef
  • 1 egg
  • 1 tsp mustard
  • 1 tsp salt
  • 1/2 cup milk
  • 1/2 cup breadcrumbs or crunch up some crackers

Sauce

  • 3/4 cup brown sugar
  • 1 tb mustard
  • 1 tb white vinegar
  • 2 tsp water

Mix up all the loaf ingredients – shape it into a loaf pan and the cover it with tinfoil.  Bake at 325 degrees F for 30 minutes.  Take out of the over, take off the foil and drain off the liquids that have formed.  Once drained, pour the sauce over the loaf.  Put back in the oven for another 30 minutes, this time uncovered.  Enjoy!

It’s a pretty simple recipe.  Only problem I ran into making this myself was that we’re still trying to sort out the oven in our new place.  It seems to take a bit longer to bake things than did our previous stove.  I’ve been getting good use from my digital cooking thermometer.  As I discovered…when using one of those, make sure you’re measuring the temperature in the middle of the loaf (I pushed it in too far so it was on the outer edge of the loaf near the pan where it is hotter than in the middle.  Ooops – lesson learned).  I’m debating turning our oven a bit hotter, or just leaving things in for another 5 minutes or so beyond the suggested cooking time.  We’ll get it sussed.

This one is 5 stars across the board, everybody including our picky eater loves it.

As for budget?  If you get it on sale, your pound of beef is $3.  An egg and crackers and the brown sugar are the next most pricy elements.  I’d guess that between everything else in the loaf itself, combined with the rice and corn on the side you’re looking at…$7 all in for this one.  It usually gives us 6 decent sized slices (or 2 ‘Daddy sized slices and 4 medium sized ones for everybody else…) so it feeds all 5 of us, and there’s usually 1 slice for leftovers.  Boom!

-g

Shepherd’s Pie


I know I promised meatloaf, but…something came up.  Namely, I decided to use that ground beef I had thawing and take a swing at Shepherd’s Pie!

I’ve made this dish I believe…once previously.  It essentially wound up being a veggie casserole with potato on top.  Not very good.  So, while doing a little hunting online for inspiration I stumbled across this video by Gordon Ramsay.

A bit MTV, isn’t it?  Yeah.  While the video doesn’t really give you much in the way of measurements and actual instruction…I watched it a couple times, picked up a few ideas and decided to wing it.  The verdict?  My wife called dibs on the leftovers, my one kid gave it a 6 stars out of 5, and our picky eater made toast.  I was tempted to throw a few Gordon Ramsay adjectives their way, but…everyone has their own preferences, right?

Here’s how it all shook down.

Gordon Ramsay Inspired Shepherd’s Pie – A DT2C mashup! (?)

The Mashed Potatoes.

  • 2 lbs potato.  Salt some water, peel and dice the potatoes and boil them until you can put a fork in them without that crunchy potato resistance.
  • Drain
  • Add a splash of milk.  Mash.
  • Add 2 egg yolks.  Stir it all up.
  • Add about 2 tablespoons of Parmesan cheese.

I started the potatoes boiling and cooking while I was doing the meat.  Once the potatoes were ready for mashing, the meat was simmering off some liquid.  It all timed out rather nice.

The Meat.

  • 1 lb lean ground beef.  (Ramsay used Lamb.  Who’s got THAT lying around?) Brown it, strain it, set it aside for a bit.  You’ll want to use a large deep pan you can load up and simmer things in.
  • 1/4 onion – shredded with a grater.  Could have done more, I had 1/4 onion on hand.  Go with 1/2.
  • 1 carrot – shredded with a grater.  I did about 8 mini-carrots.  A big one would have been much easier to shred.  It all tastes the same.
  • 2 teaspoons crushed/minced garlic.  I’m guessing on quantity here, I was really winging this one.

Saute the onions and carrots, cook them down a bit, then toss the ground beef back in.  Alright, now it’s time for some seasoning.  Here goes (to my recollection).

  • 2 teaspoons rosemary
  • 2 teaspoons thyme
  • 2 tablespoons Worcestershire sauce
  • 2 tablespoons Tomato paste (I used a couple squirts of bottled pizza sauce I had handy – saving the tomato paste in the pantry for another recipe this week…)
  • a few good cranks of black pepper from the pepper mill
  • 1 cup chicken stock/broth

Let everything relax and simmer together.  This would be a good time to pre-heat your oven to 350 degrees F (180 Celsius).  You want to get the beef mixture cooked down so it’s still moist, but not runny.  Okay.  Time to toss it all together.

Grab a casserole dish.  The round ones with a lid (you won’t need the lid unless you have leftovers – and with this one you won’t have leftovers.  Yum.)  Put the meat mixture on the bottom, press it down a bit.  Next, put the mashed potato mix on top, kind of like you’re icing a cake.  Once that’s done and smoothed over a bit, take your parmesan cheese and sprinkle generously over the top of the potato.  I then gave a few cranks of black pepper from the pepper mill and sprinkled some paprika spice on top to give a bit of colour to everything.  Not much, just a light dusting.

Whack it in the pre-heated oven for…20-25 minutes.  Scoop.  Serve.  Enjoy.

With the ground beef running around $3.50, the potatoes about $1.50 and then various spices, odds and ends and parmesan…I’m guessing all tallied this one came out to about $8 to pull off?  I shredded up a head of romaine to have alongside this.  I mean, there’s already veggies, starch, protein and dairy included…and as a heavier dish, a light salad made a good companion.

Butter Chicken and Naan

I tried making butter chicken sauce once.  It took most of the day in the slow-cooker and turned out….alright.  With that said, we will typically pick up a jar of pre-fab butter chicken sauce at Costco. The bottles are a bit bigger than the usual VH sized ones at your grocery store and we really enjoy the sauce.  I’ll stretch it a bit more by adding a 1/2 cup of yogurt or sour cream when it’s simmering.

So the bulk of the meal looks like this…

Chicken – 2 chicken breasts cubed, seasoned with paprika, pepper, curry.  Fry in a touch of olive oil in a pan.  Once done, drain any juice if you want, add the butter chicken sauce and simmer.  Add a 1/2 cup of yogurt (mango flavoured is amazing in this).

Rice.  4 cups water, 2 cups rice.  Cover, bring to boil.  Once boiling, turn down to about 30% heat for a slow boil, stir, cover, then leave it alone for about 40 minutes.

NOW…here is where I play and have fun with this meal.  The Naan.   Fresh made bread is hard to beat.  Here’s the recipe I’ve used that works amazingly well.

Naan

I usually just use vanilla yogurt instead of greek yogurt.  Sour cream works good too.  Basically you just need a high fat content dairy in there.  I avoid the melted ghee and cilantro for garnish and instead add some powdered garlic, tumeric and fennugreek.  (I saw that combination at a bakery once, and it tastes pretty good in this spice universe).  I never really measure the spice I put it, more of an eyeball thing, but if I had to guess I’d say about 1 tablespoon of each.  If you think you’ve put too much in, you’re probably right where you need to be flavour wise.  Heads up that tumeric can and will stain just about anything (my plastic mixing bowl is now a permanent shade of yellow in places), but it’ll usually come off your countertop if you get at it right away.  I’ve resorted to a Lysol disinfectant wipe on occasion if it’s being particularly ornery.

I’ve discovered through trial and error that you need to really roll the dough pretty thin for it to bubble and puff up.  I burn these a bit on purpose on the griddle and skip the ‘hold over open flame’ as described in the recipe.  I’m sure that would work great, I just don’t have a gas range handy to pull that off.

We have a couple picky eaters in our house, but this one is a 5 star win across the board and that surprised us.  There’s a bit of spice, but again, if you thin it out a bit with yogurt or sour cream that will take some of that heat off.

I usually serve with a side of peas.  Want to go vegetarian?  Swap out the chicken for paneer (if you can find it).  It’s a hard style of cheese that gets used in Indian cooking a fair bit.  Not all grocery stores carry it.  My best success in Saskatchewan has been at the Independent chain of stores, which probably means you’ll find it at Superstore as well.

There!  I think tomorrow we’ll delve into one of the all-time favourites around our place.  Nana’s Meatloaf!

-g

BBQ (no bacon) Grilled Cheese

Okay, this one is just a fun and silly one.  My kids got hooked into Cool Math Games at their previous school.  It’s a fun and (almost?) educational website they can go on to learn math skills or in some cases, how fast they can click the mouse button (future console button mashers represent!).

One of the games on the site that is a big ‘win’ around our place is Papa’s Cheeseria.  It is one of a whole series of “Papa’s” games that has the kids running a virtual restaurant.  They learn how to accept an order, cook the meal to spec, and then deliver it to the customer who passes judgement on how well they followed their directives.  In Papa’s Cheeseria, you’re running a bespoke grilled cheese shop, and interestingly enough, some of the combinations they have listed in the game sound quite delicious!  On that front, it’s made lunchtime around here pretty interesting some days when one of the kids decides that a standard grilled cheese sandwich, just isn’t going to cut the mustard. Enter, the BBQ (no bacon) Grilled Cheese.  I say no bacon as we didn’t have any bacon just laying around the house once this had been requested, so I substituted as best I could in the 5 minutes I had in front of me.  You might be able to read the order ticket, but if you can’t, here’s the basic rundown.

  • Bread
  • Bacon (I substituted with a slice of processed turkey breast sandwich meat)
  • BBQ Sauce
  • Lettuce (romaine works just fine)
  • Ketchup
  • Bacon (repeat previous subsitution)
  • Bread

Oh!  and don’t forget…

  • P.S. – put in some cheese

They almost forgot the most important part of a grilled cheese sandwich!

Now, I used to slather up some bread with butter and toss on the frying pan, but as of late, I’ve avoided that.  I’ll give a warm grill just a quick shot of cooking spray before tossing the bread down.  It works, will help add some nice toasty brown/black colour, and not be quite as artery-clogging.  I’ll toss the sandwich on the grill, get a good toast on both sides, then I do a little bit of magic.  Steam.  You want ooey, gooey grilled cheese that’s insanely melty and leaves behind what my kids call “cheese bridges” when they bite in and there’s a foot long trail of cheese between their mouth and the sandwich when they pull it away?  You need steam.  Have a squirt bottle handy.  Spray the grill, just off to the side of the sandwich you’re toasting, and then immediately drop a big pot lid over top of the sandwich and the now steaming wet spot on the grill.  If you do it quick enough, you’ll capture the steam under the pot lid, it will help turn the cheese into liquefied awesome, and your Cheeseria ranking will go through the roof.

Now, as for this specific recipe…with lettuce involved, what I wound up doing was just making a grilled cheese with two pieces of sandwich meat in the middle…after the bread had been toasted and the cheese melted, I pried apart the sandwich between the meat slices, added the condiments and lettuce and then flipped everything back over.  Is this a fantastic recipe?  Ug.  Far from it.  But it was what my 8 year old ordered and I got a hug and 2 thumbs up, so, hey – that’s a winner in my books.

-g